How to Connect Google Analytics to WordPress
Agreeably, it’s strange not to use a tool that is not only free but also very useful. That’s why we’ll explain how to add the Google Analytics service to your WordPress website so that it works correctly and is truly convenient to use.
For those who may not know what GA is, we will provide a brief explanation. Google Analytics is a free service from Google that allows you to track web traffic and user data that visit your site.
Important Note:
In this article, we will be connecting Google Analytics 4. There are many guides online for connecting Google Analytics with the UA model, but unfortunately, Google is phasing it out, so we will focus on the new model.
More information about Google Analytics can be found at this link.
Primary Settings in Google Analytics
Before integrating with WordPress, you need to perform the primary settings for Google Analytics.
First, go to this link and create a Google Analytics account. To successfully do this, you need to have a Google ecosystem account, such as a Gmail email address.
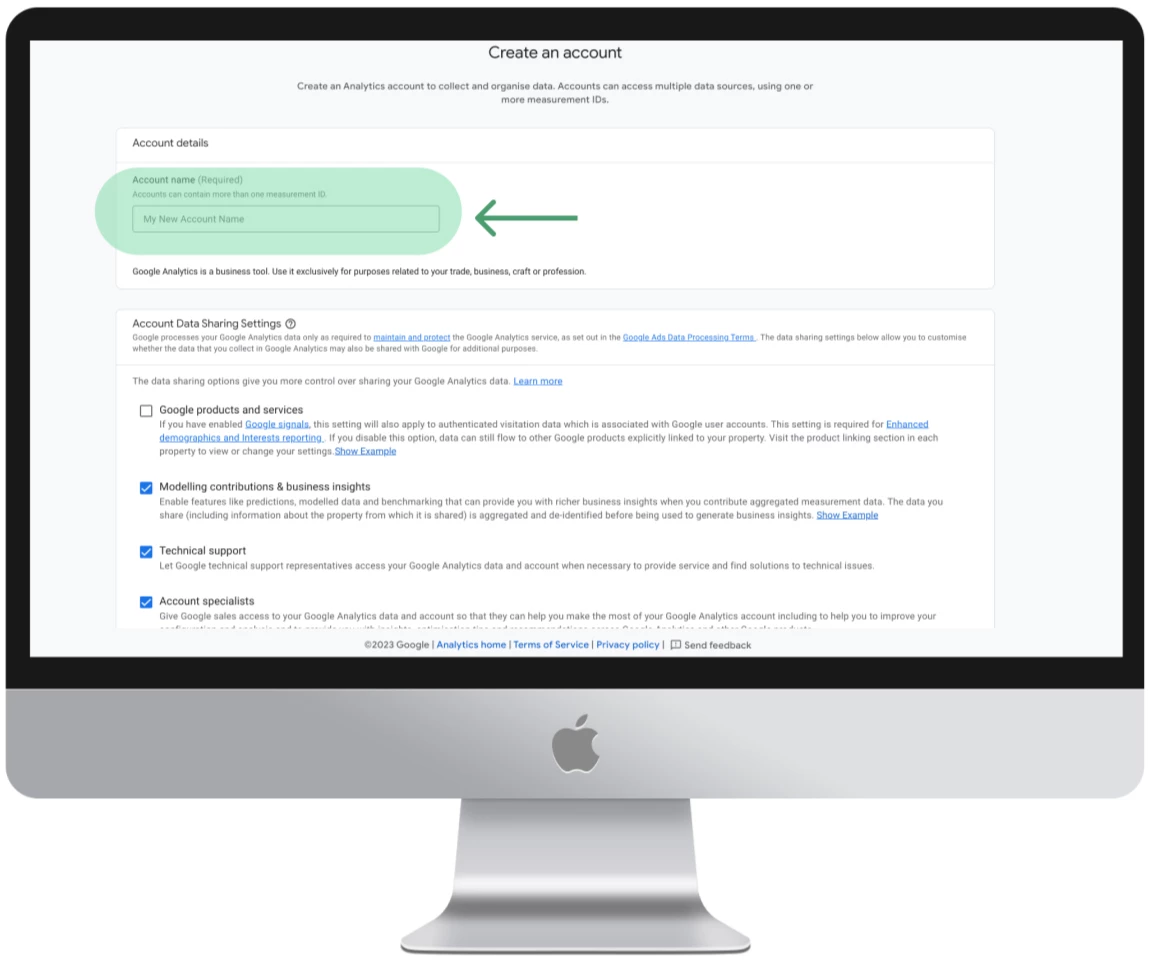
After clicking the “Start measuring” button, our adventure begins. On the next screen, you need to enter the name of your account and accept the agreements.
Important note:
You can connect multiple websites to one account, so you can use the name of your agency or company in the account name.
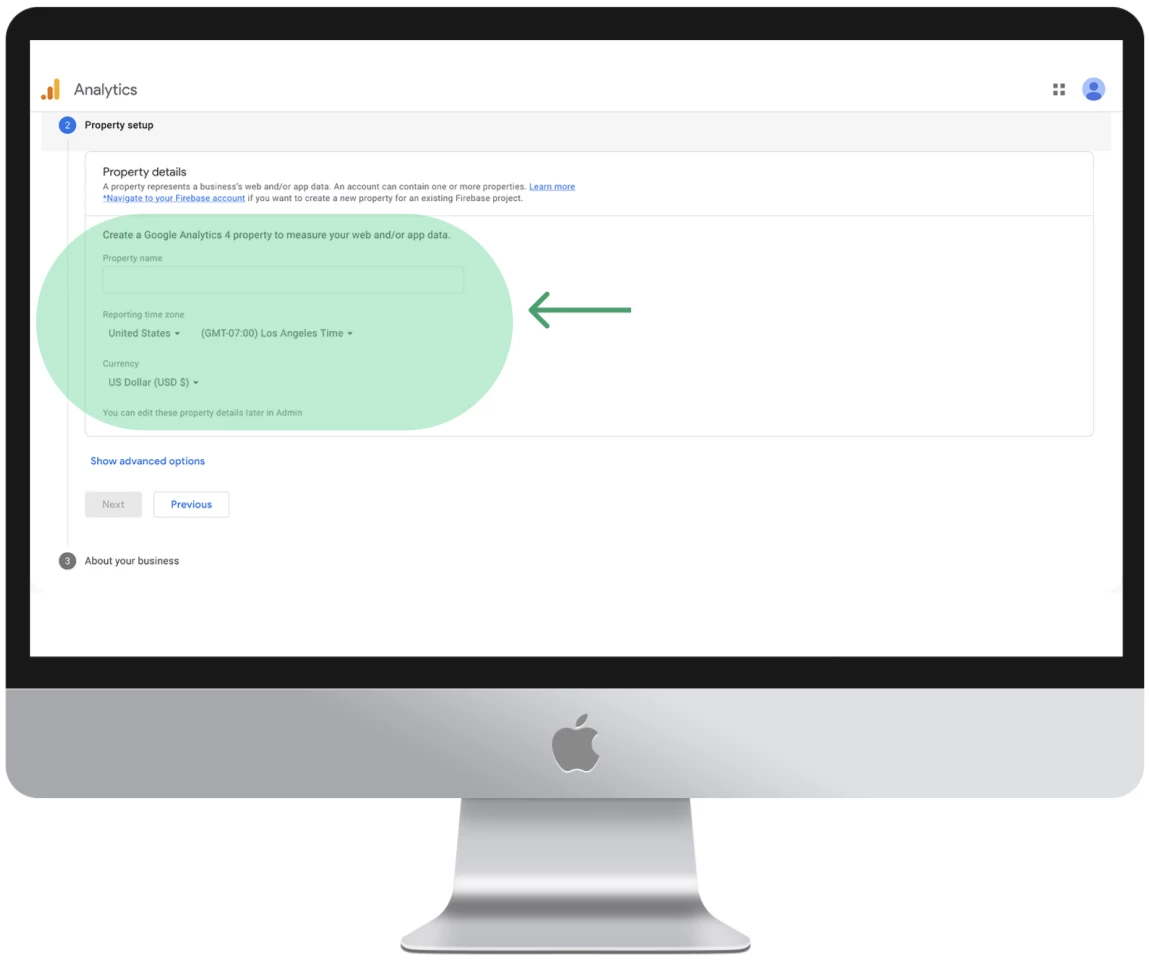
Now it’s time to fill in the properties.
Enter your website name, time zone, and currency. Simply select the options that comply with the legislation of your country or region where your website operates to avoid future issues.
At this stage, the final push remains – setting up the data stream.
Important note:
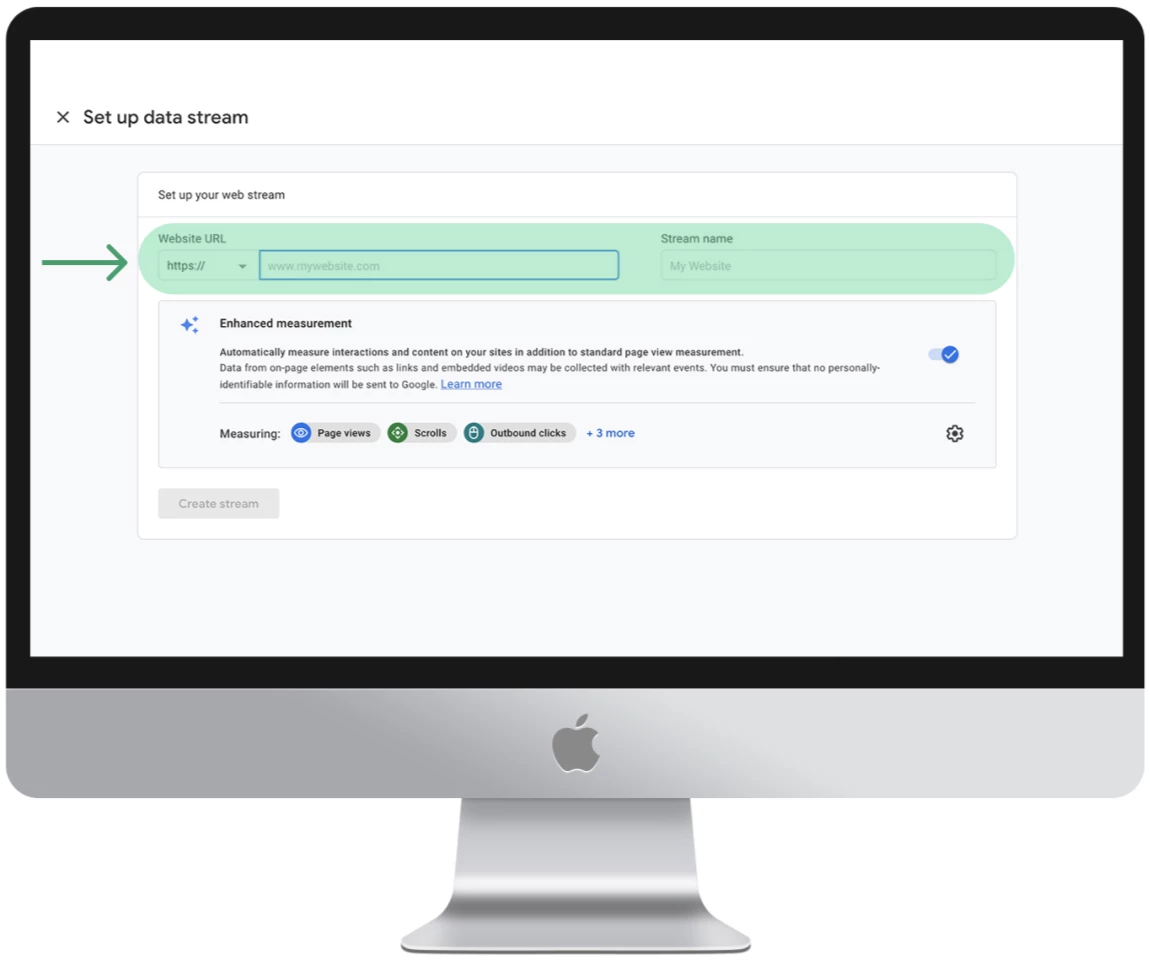
When connecting a website on WordPress in Data Collection, select the option Web Stream.
● Enter the URL of your website and its name (use a name that is clear to you, such as the actual name of the website, to make it easier to navigate in the future).
● Once you click the “Create Stream” button, you will see the stream name, stream URL, and identifiers.
● The Measurement ID is needed specifically to connect our website to GA.
Connecting WordPress to Google Analytics
At this stage, there are three ways to add Google Analytics to your WordPress website. It all depends on your CMS ownership and ability to work with code.
The first option is to use a special plugin, which means you don’t need to touch the website’s code; all settings are made within the plugin.
The second option is to use a lighter plugin, where you will need to copy and paste the code into the website.
The third option is to edit the code in the WordPress theme files.
Method 1
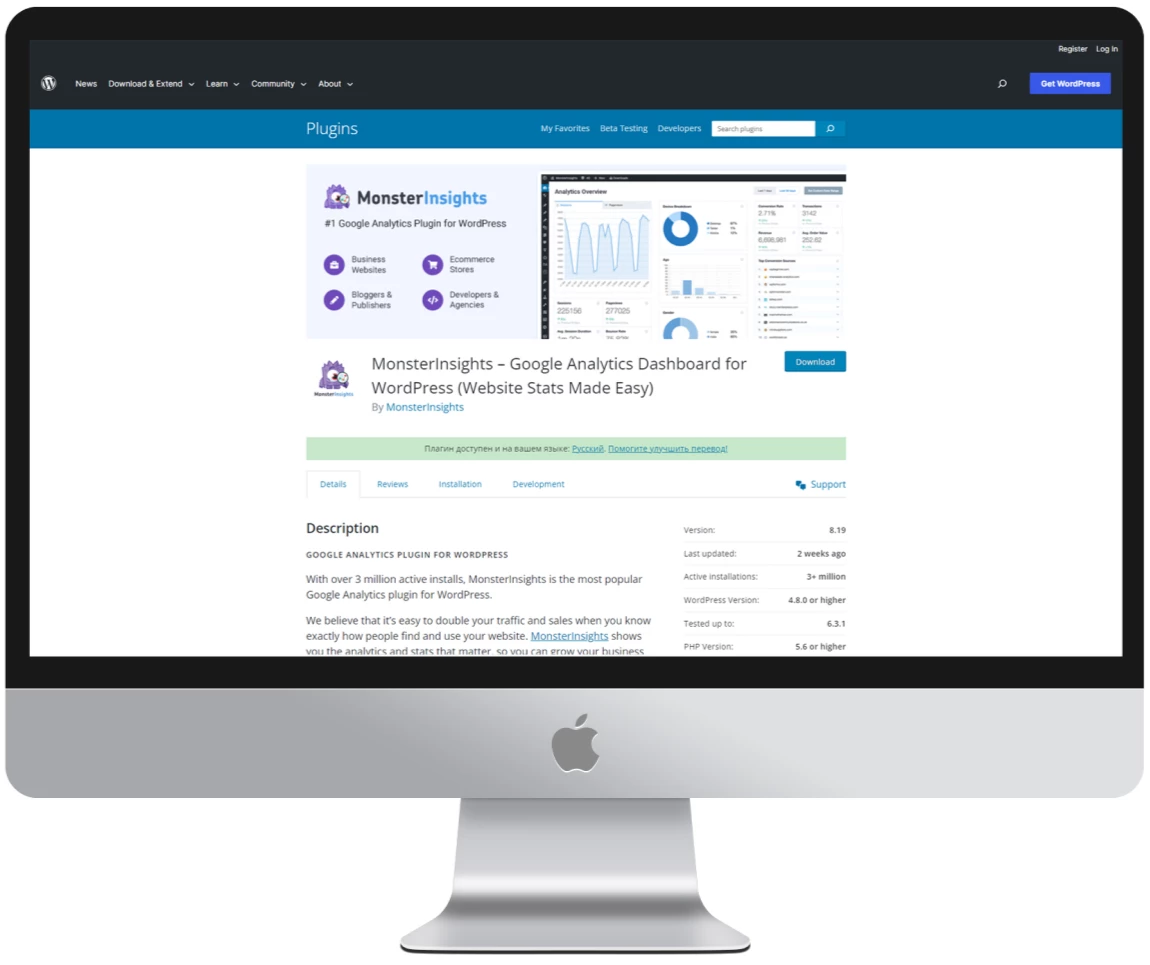
The easiest way, suitable even for beginners. It is simply enough to perform all the actions described below. We will use the MonsterInsights – Google Analytics Dashboard plugin.
For basic usage, the free version is sufficient, but you can upgrade to the premium version later to expand its capabilities.
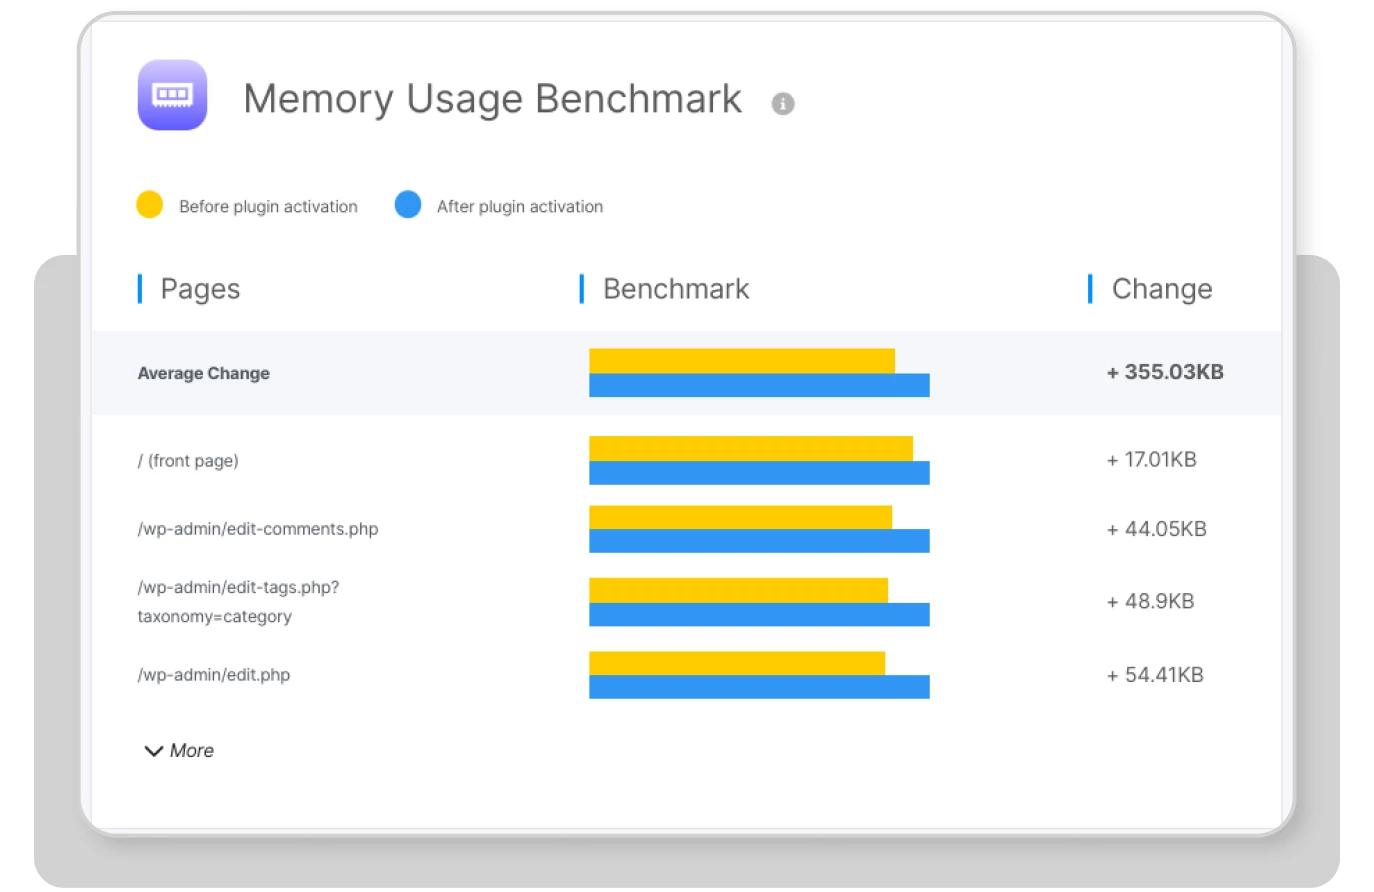
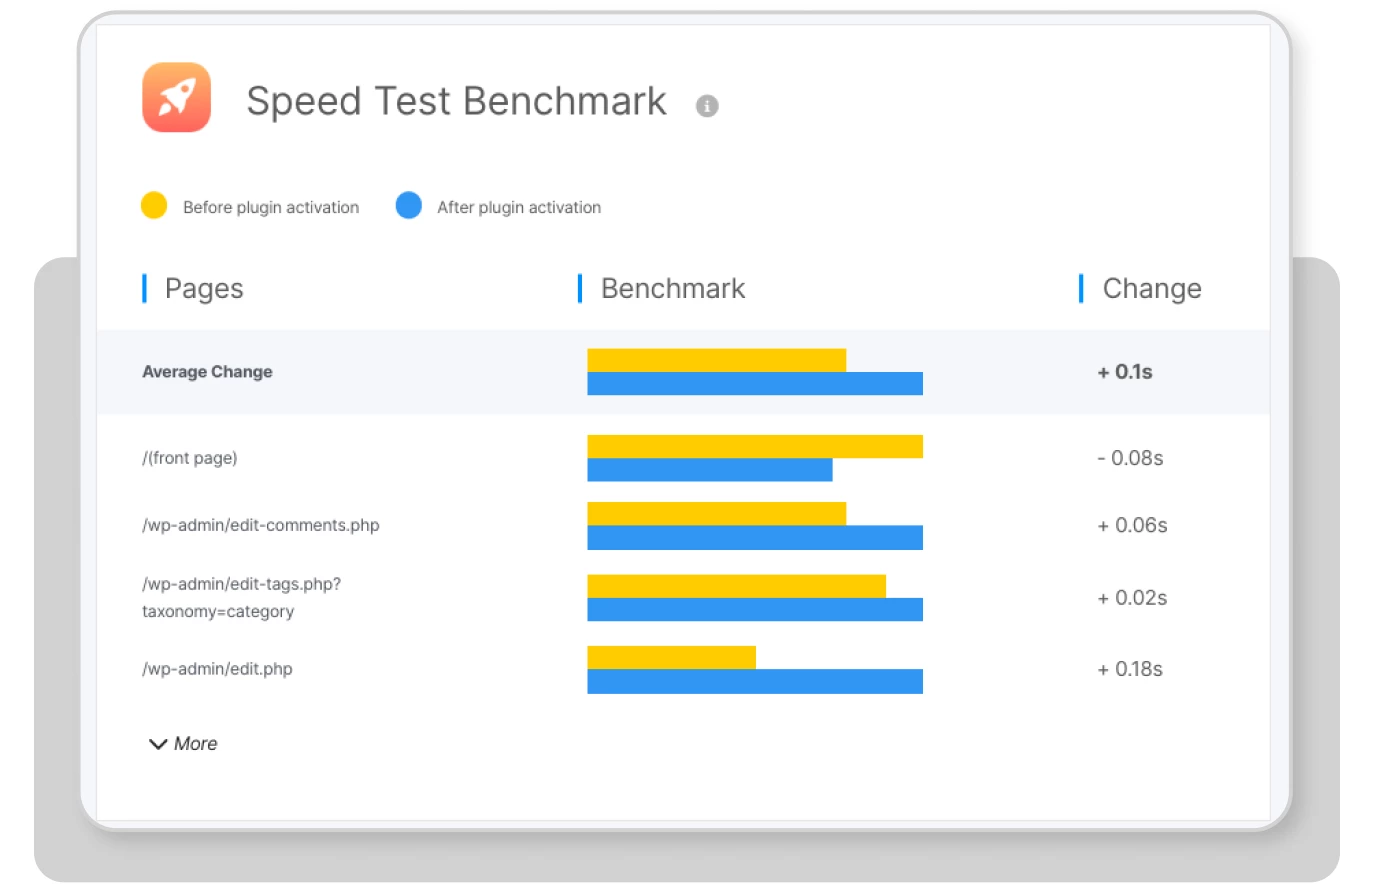
As for performance, we will use WP Hive:
As we can see, the plugin hardly uses any memory on the server.
There are no issues with the speed of operation either.
More detailed information can be found at this link.
To connect and configure the plugin, follow the steps below:
Step 1 – Install and activate the MonsterInsights plugin.
Step 2 – Launch the Setup Wizard and follow the steps provided by the plugin.
Step 3 – Sign in to your Google account that is linked to Google Analytics.
Step 4 – Grant access to your GA account that you want to connect.
Step 5 – Complete the connection process and skip the premium subscription setup.
Great! You have set up the analytics system, and now you can use Google Analytics directly within the Dashboard panel.
Method 2
The second method is to use a plugin to insert code inside the <header> and <footer> tags. You can use practically any plugin from this category.
In this example, we will use this plugin due to its popularity among users.
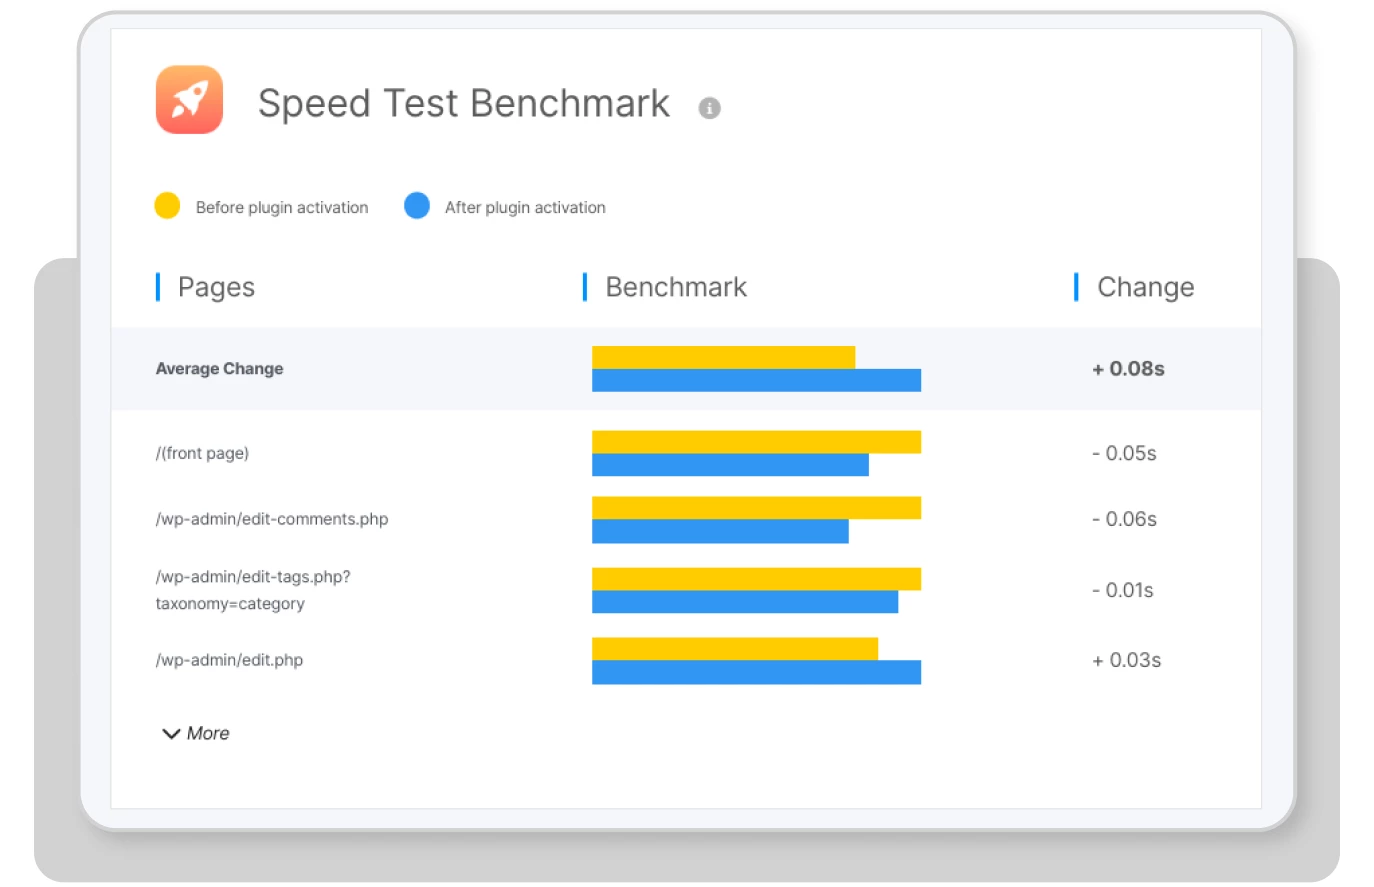
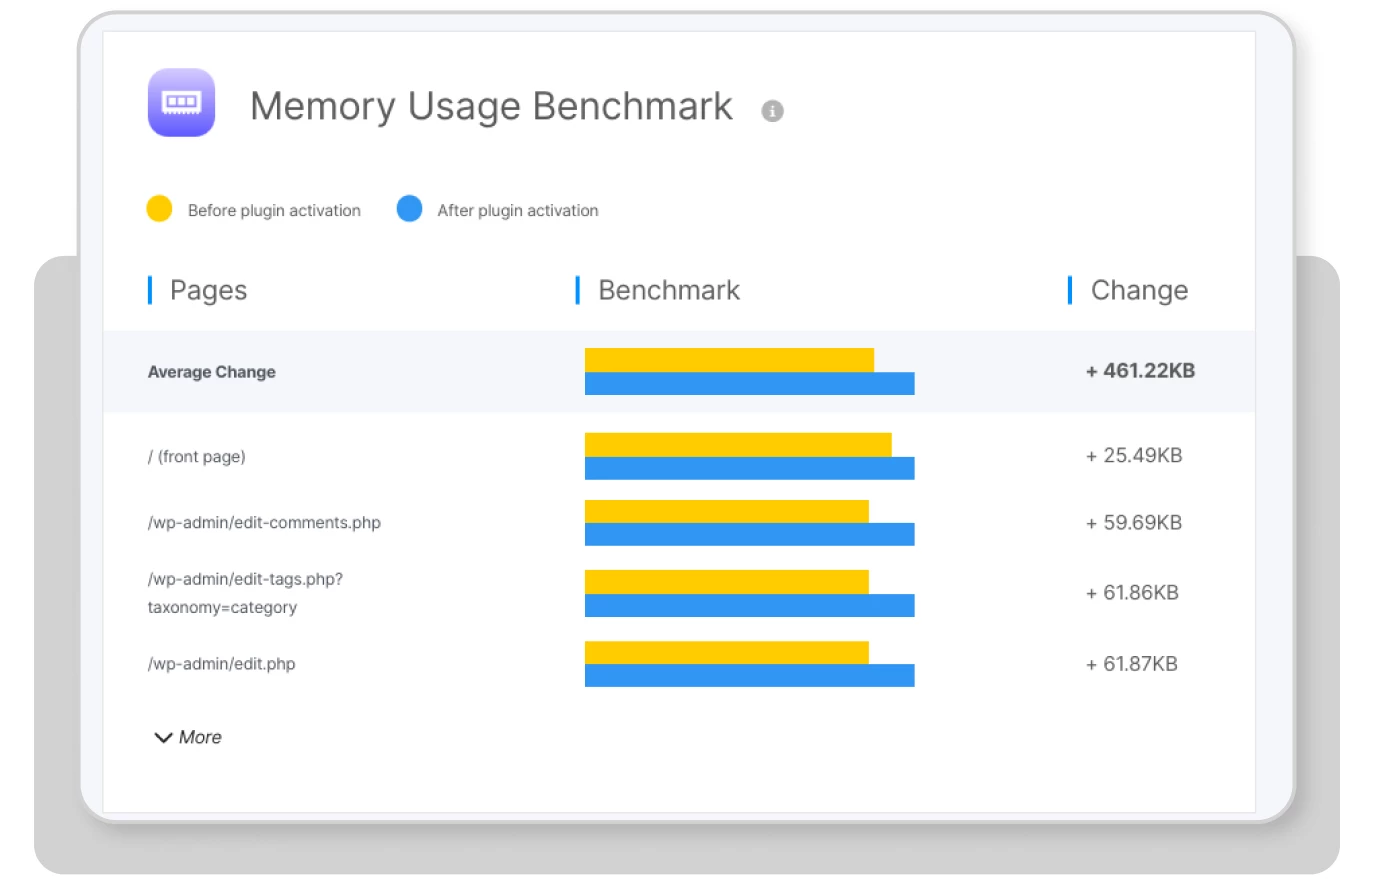
We will immediately check its impact on the system and its speed through WP Hive.
No issues were found with the speed:
But what about memory usage? It’s not as straightforward. If you have a very weak server with limited RAM, there may be some problems. However, in all other cases, there shouldn’t be any issues.
Let’s move on to the installation and integration stage:
● Just like in the first method, install and activate the plugin mentioned above;
● Go to Google Analytics, navigate to the installation instructions section, and select the manual installation option;
● The generated code needs to be placed inside the <header> tag;
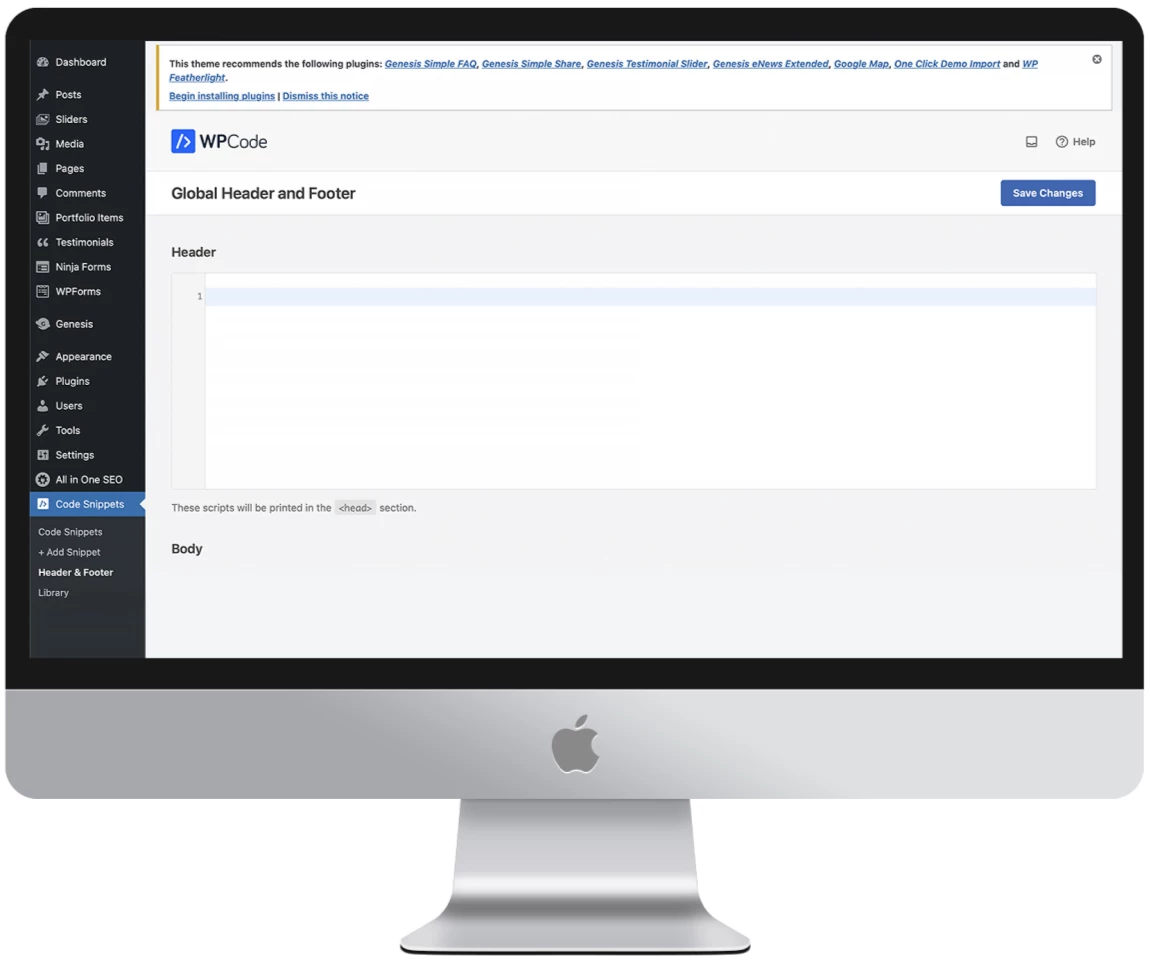
● Choose our plugin from the WordPress right menu and click on the Header and Footer option;
● Insert our code in the field and save the changes.
Great! You have completed all the necessary actions. Let’s move on to the third stage, and then we will explain how to verify the correctness of the installed code.
Method 3
The final method that we will use does not involve the use of third-party plugins.
All actions will be performed within the CMS WordPress.
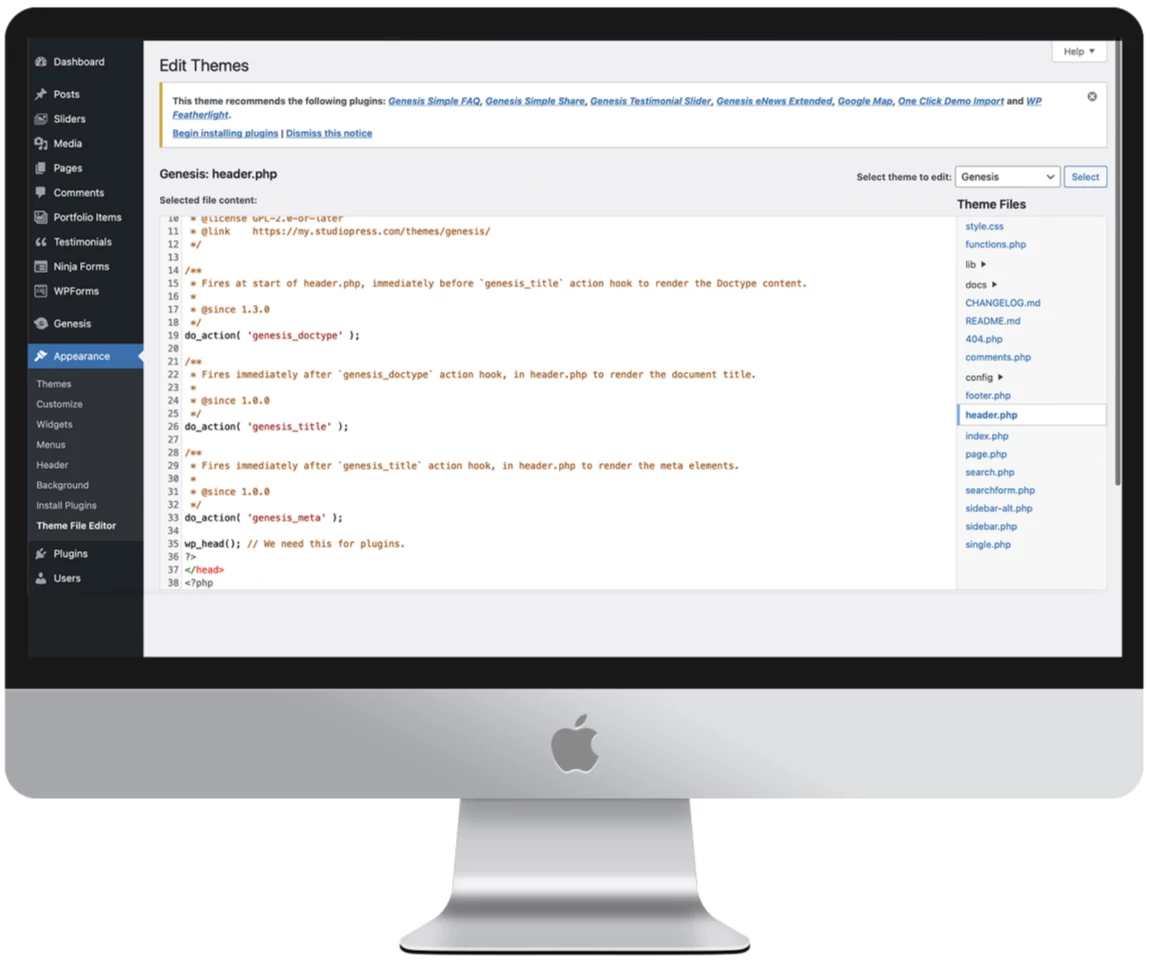
● Just like in the second method, you need to copy the GA code from the service, but this time we will insert it directly into the theme file header.php.
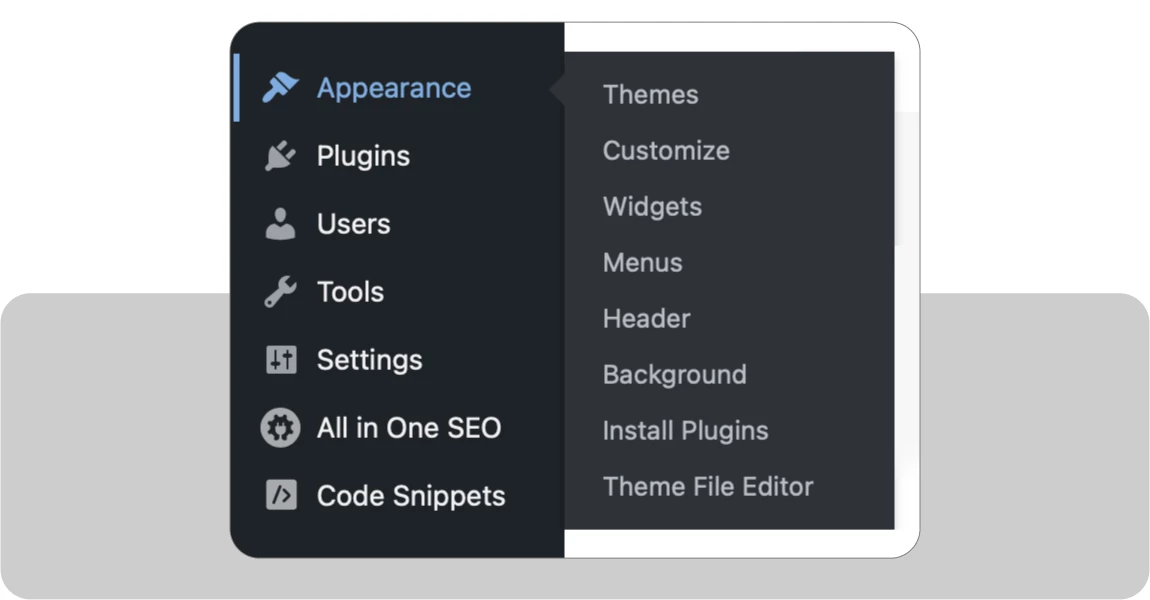
● In the WP control panel, find the Appearance section, and in the submenu, select Theme File Editor.
After the tool opens, find the file header.php in the right menu.
Insert the previously copied tracker code before the </head> tag. Now save the changes. Great! You’ve mastered this method.
How to check integration?
Regardless of how you decided to install Google Analytics on your WordPress,
it is necessary to check the correctness of the installation after its completion. To make it easier for users, Google has developed a special extension for its own Chrome browser – Tag Assistant Legacy (by Google).
Install the extension and go to your WordPress, and the extension will do the rest –
it will analyze the tags installed in the code and notify you of any existing errors.
Conclusion
It’s time to summarize. In our humble opinion, the best option is to use the third method as it eliminates the use of various third-party plugins that only solve one task and additionally burden the system, albeit insignificantly. However, if you understand that you won’t be able to manage it, simply use the first method because besides integrating with Google Analytics, the plugin will provide you with a dashboard of data that will simplify interaction with the analytics service.
Thank you for your time! I’m glad you read the article to the end and see you next time!


